Showing posts with label Free Crochet Pattern. Show all posts

Saturday, November 22, 2014

ELSA Hat

My next goal is to write down my Elsa Hat Pattern. I know this one is pretty popular. It is funny at the event the Anna hats were more popular than anything else, but I think it is because the Elsa hats look strange when they are lying flat. I decided to put them on a wig head and they look so much better.


My daughter wants to give everyone she sees a handmade hat. So we came up with an idea to give away a bunch of hats to people who may think the world of them. At or around Christmas (so I have time to make more) we plan to donate hats especially the ones with the long hair to the kids with cancer here in the area. 

I still have a lot of work to do in order to make this happen. First I need to figure out how many hats I will actually need. Also how many Elsa hats vs Super Hero hats. I thought too if I shared my pattern with others they might be inclined to donate their time and resources to make one hat for a small kid so we can donate as many as possible. This is still a work in progress, but ideally this is our goal this winter. I hope everyone enjoys this one. The pattern is still lodged in my brain so as soon as I am able to explain it I will be back to update this post with the pattern.

Free pattern to be posted soon


If you are in the Las Vegas area, we will have another booth in two weeks where I will be selling more hats like this one. Orders are starting to build. I wish I could do this full-time but I actually have a full-time job, besides that I am not crazy fast so it takes me a long time to sew each individual hair piece and I am sure I would develop some sort of crochet-hand-tunnel syndrome :) if I did this all day.
 
Visit more creations for sale visit me at www.facebook.com/preciousyarn

Panama Hat Pattern

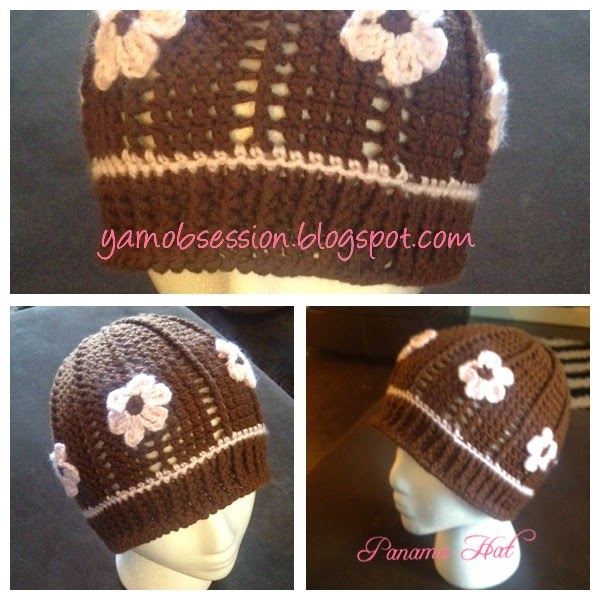
FREE Panama Hat Pattern


Abbreviations used in pattern:
Ch – Chain
SC – Single Crochet
DC – Double Crochet
TR – Triple Crochet
Sl – Slip
St – Stitch
YO – Yarn Over

I have been obsessed with the Panama Hat Patterns I have seen posted all over Facebook and Pintrest. It is just too bad I don't speak Russian and Google while it might be great for many things does not translate crochet patterns into English very well at all. I was left with a big mess. Finally I am able to share one pattern that turned out for me. 

This one is more straight than the twisty curve because of the positioning of the flowers. I will make adjustments if anyone is interested in additional ones with the more twisted look. 

Size approx. 20”
Hook Size: C


To increase the size of the hat start with more DC in round 1 (12-15 will increase the size). Recommend starting with 10 if using standard weight yarn medium 4. If you choose to use the Patron thin delicate yarn it is really pretty, but it is smaller so I recommend starting with more DC in round 1.

Chain 8 to make a ring - OR - Ch 3 (magic ring)

Round 1: 10 DC in the 3rd chain from hook to allow the ring to adjust to the size you need. Sl st into st DC of the round

Front Post Double Crochet (Fpdc) – makes a double crochet around the front of the post. Yarn over (YO) with front facing, insert your hook from the front to the back around the post of the dc on the previous row. (The hook should be positioned horizontally behind the double crochet that you’re working around)Complete the st as a regular DC. 

Round 2: Ch 4 Fpdc around first DC not the same DC as the connecting round, ch1, Fpdc, ch1* in each st around, sl st to top of first DC at the start of the round.

This looks like a pinwheel almost. You should have a Fpdc around each post from row 1 with a ch1 space separating each post.

Round 3: Ch 3, Fpdc around same connecting post from the previous row, ch1, DC in the top of the Fpdc from previous row, *Fpdc around DC in the previous row, ch1, 1 DC*, repeat * to * to the end of the round. Sl st in first DC.

Notes: row 3 - the DC is made in the same DC as the Fpdc. At the end of the round it will look almost like an X shape.

Round 4: Ch 4, Fpdc in 1st post, ch1, 1 DC in next DC, ch1, Fpdc next post, ch1, 1DC in next DC, ch1*, repeat * to * to the end of the round. Sl st in first DC.

NOTE: the ch spaces act as an increase but maintain the lovely square pattern throughout the hat.

Round 5: Ch 3, 1 DC in same DC, ch1, Fpdc around next post, ch1, 2 DC in next DC, ch1, 1 Fpdc in next post, ch1* repeat * to * to the end of the round.

(Careful to remember that each Fpdc is separated by a ch1 space. This maintains the lovely square lace pattern down the side of the hat).

Sl st in first DC.

Round 6: Ch 3, 1 DC in same DC, 1 DC in next DC, ch1, Fpdc around next post, ch1, *2 DC in next DC, 1 DC in next DC, ch1, 1 Fpdc in next post, ch1* repeat * to * to the end of the round.

Pressed flat you should be able to see the pattern forming in groups between the ch1 spaces, each row the number of DC increases between these ch1 spaces to create the lovely pattern that makes this hat unique.

Round 7: Ch 3, 1 DC in same DC, 1 DC in next 2 DC, ch1, Fpdc around next post, ch1, *2 DC in next DC, 1 DC in next 2 DC, ch1, 1 Fpdc in next post, ch1* repeat * to * to the end of the round. Sl st in first DC to complete the round.

Round 8: Ch 3, 1 DC in next DC, 1 DC in next 2 DC, (ch 3 counts as a DC), ch1, Fpdc around next post, ch2, *1DC in next 4 DC, ch1, 1 Fpdc in next post, ch1* repeat * to * to the end of the round. Sl st in first DC to complete the round.

Repeat Round 8 until the hat measures 17cm from round 1 to the bottom remember to maintain the ch1 spaces between each 4 DC and Fpdc to bring the lovely box open through to the bottom of the hat.

Start of brim: Sl st color change (soft pink)
Round 1: Ch1 SC in each of next 4 DC across to ch1 space, 1 sc in ch1 space, 1 sc in Fdpc post, repeat * to * to end. Sl st.

Round 2: 1 SC in each sc around to end. Sl st.

Round 3: switch back to main color (brown) – ch 4, Fdpc next sc, DC in next sc, Fpdc in next sc, DC in next sc, continue to end of round.

Round 4: Ch 3, Fdpc next post, DC in the top of the next Fpdc, Fpdc in next post, 1 DC in next post,* repeate * to * to the end of the round. (the pattern should look like DC, Fpdc, DC, Fpdc. 

Round 5 – Round 8 repeat round 4 depending on desired length may add another round if choose.

Round 9: will be worked backwards around the hat still on the front side, with  main color ch1, sl into previous st (st to the right of the hook) pull up onto hook (2sts on hook) yo and pull through all st on hook (sc), 1sc in previous st, repeat around the hat (worked backwards without turning it over). The sc are worked from the last st to the first st. It will feel a little strange working backwards but you will get the hang of it.


Flowers (make 6)
Main color (brown)
Ch 7 connect to form a ring
5 sc in ring

switch color (pink)
ch4, 2 triple crochet in next st (yarn over twice instead of once like for DC to create a triple crochet – it gives the petal a little height), ch 3 sl st into same sc, *ch 4 2 triple crochet in next st, ch 3, sl st into same sc* (petal made), repeat * to * until 6 petals are made. Sl st to bind off remembering to leave a longer tail to sew flower to hat.


Sew flowers to the hat just above the brim on the fpdc. I skipped every other fpdc to balance them out evenly, but any flower and any place would look lovely.

Friday, January 11, 2013

Recycled Crayon Cozy Cup Holders Pattern


Description
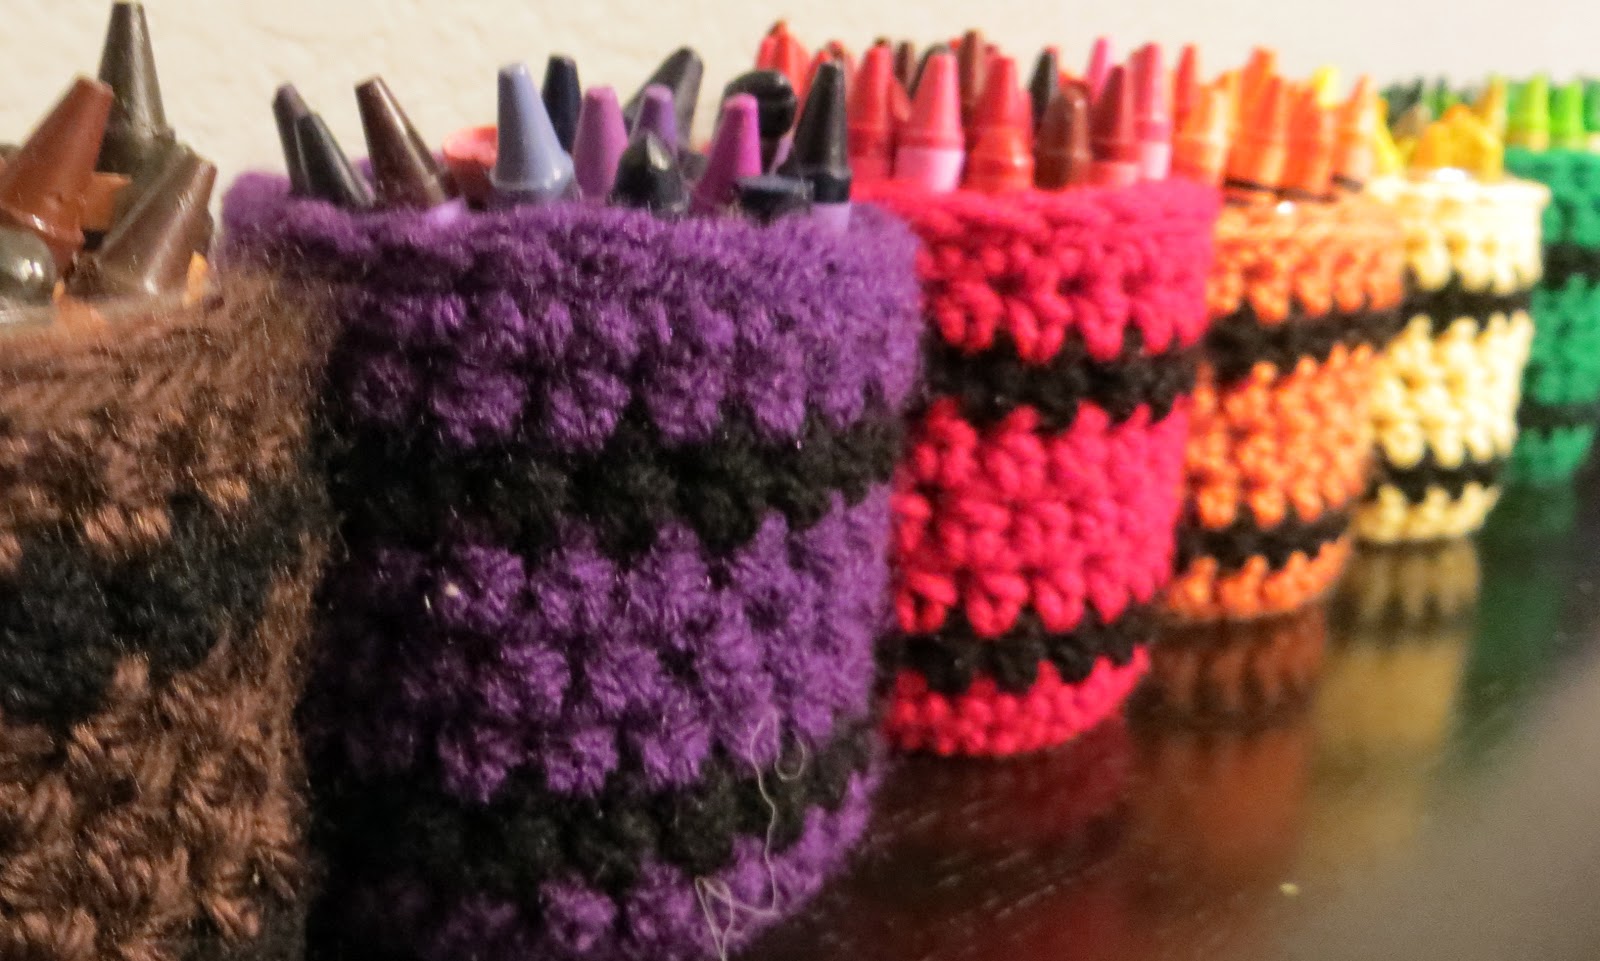
Apparently my daughter is quite spoiled, considering we had enough crayons to fill each cozy with the appropriate color. The idea was to get these annoying crayons off the floor and out of random places where they did not belong. These crayon cup rainbow cozies turned out to be a great way to store all those lost crayons that are missing their home and keep ending up on the floor.

WARNING: These might bring life back to arts and crafts and create a desire for small children to want to color


Required Materials
  1. 9 empty plastic water bottles (Use any brand. The ones that have the rings around them making it easier to size the cup holder). The plastic bottles from Whole Foods is what I used. Specifically the brand, Crystal Geyser 16.9 fl oz.
  2. Heavy Duty scissors (used kitchen scissors)
  3. Sharp small fine sewing scissors
  4. 9 skeins of yarn:  Red, Orange, Yellow, Green, Blue, Purple, Black, Brown, White (Brand: Red Heart Super Saver or 100% acrylic yarn)
  5. Crochet Hook: Size H (smaller size if available for assistance in weaving in ends)
  6. 7-8 boxes of crayons (During back-to-school season these can be a cheap as $1.00 per box. 
Clear Plastic Cup Holder 
(Make 9 Plastic Cup Holders)

This is a great way to recycle all those accumulating water bottles. The base of the crayon holder is the bottom of a plastic water bottle. 
Start with the 9 empty plastic water bottles. 
Start cutting the tops off each one using the heavy duty scissors careful not to smash them. 
Once the tops are removed it is easier to shape the bottles to the size you prefer. I used 7 rings from the bottom approximately 5.5 inches. 


Cut along the inside of the 7th ridge from the bottom of the plastic water bottle to create the plastic cup for the crayons. This is the cup that actually holds the crayons. The crochet portion will wrap around the plastic cup holder. This should hold about one small box of crayons.
Repeat these directions for all 9 plastic water bottles. The results 9 plastic cup holders for your crayons.


If you do not want these crayon cozies to disappear into bedrooms and small cubbies, you may want to make them stationary. 


My daughter loves these so much she seems to want to carry them everywhere she goes. It has actually helped clean up time. She is actually excited to clean up her crayons, but more importantly she is learning how to keep them organized while using them rather than dumping the entire box or container on the floor.

I advise that you attach small pieces of velcro tape at the bottom of each plastic cup and the top of something sturdy enough to hold them stationary so they do not tip over while being used. 

They can be attached to the top of a kids table, plexiglass, or large plastic lid. 


Crochet Pattern for the Crayon Cozies
Ch 25 (MC)
Row 1: (MC) sc in 2nd ch from hook, sc in the next 23 ch. (24 sc). Sl st into the 1st sc creating a ring. Be careful not to twist the the rnd. 
Rnd 2: (MC) ch 2 - (ch 2 does not count as a hdc - see NOTE for clarification), hdc in same st as the ch 2, continue to hdc in every st around to the 1st hdc , sl st in the top of the 1st hdc, not the ch 2 (24 hdc), fasten off.

Important Author’s Note:

Be careful not to add any additional stitches while making the rounds. The ch 2 does not count as a hdc so you want to be careful not to use the starting st twice. The 1st hdc is made in the same st as the ch 2, therefore the stitch should not be used again at the end. It might look like you are skipping the last hdc in the rnd, but if you count the stitches in that round you should have 24 hdc.                                                                               
Rnd 3: (CC) switch yarn to CC, sl st into starting st, (ch 2 does not count as a hdc - see NOTE for clarification), hdc in same st as the ch 2, continue to hdc in every st around to the 1st hdc , sl st in the top of the 1st hdc, not the ch 2 (24 hdc), fasten off. 
Rnd 4: (MC) sl st using MC into starting st, (ch 2 does not count as a hdc - see NOTE for clarification), hdc in same st as the ch 2, continue to hdc in every st around to the 1st hdc , sl st in the top of the 1st hdc, not the ch 2 (24 hdc). Do not fasten off.
Rnd 5: (MC) Repeat rnd 4, (Do not fasten off).
Rnd 6: (MC) Repeat rnd 2, (fasten off).
Rnd 7:  (CC) Repeat rnd 3, (fasten off).
Rnd 8: (MC) Repeat rnd 4, (Do not fasten off).
Rnd 9: (MC) ch 1, sc in same st as the ch 1, continue to sc in every st around to the 1st sc, sl st in 1st sc. Do not fasten off.
Rnd 10: (MC) Do not ch, sl st in every sc around to 1st sl st. cut yarn and fasten off and weave in ends.

Make 9 cozies: Brown, Purple, Red, Orange, Yellow, Green, Blue, Grey, and White 


I think fastening off between colors looks better than connecting colors in the rnd. If you prefer to continue without fastening off between colors, you will want to connect the alternating color at the start of each rnd when you sl st completing the rnd.


I have debated on whether I should post my patterns for free or not for quite awhile. Please do not discourage the creative community by stealing others work. 

Do not steal this pattern as your own it is plagiarism and violates copyright laws. Do not steal this pattern and sell it claiming it as your own it is dishonest, harmful, and just wrong. 

However if you choose to sell your completed projects, please reference my blog. Thank you! Please enjoy!

Friday, January 4, 2013

Free Butterfly Pattern

It's interesting when a project is started especially if its freehand it might not always turn out the way you think. This was supposed to be a flower and it sort of morphed into a butterfly.

The headband is an easy shell pattern and I added a crocheted butterfly to give it some personality.


Free 3-D Butterfly Pattern
Materials Used
Yarn: Red Heart Super Saver 100% acrylic
Crochet Hook: Size J (adjust depending on desired size of butterfly)

Ch 3 - magic ring, ch 5 (counts as sc and edge of wing).

Rnd 1: sc in ring, *ch 5, sc in ring, rep from * to make 4 (5-ch loops) ending sl st in 1st sc to join. (4 times)

Rnd 2: In 1st 5-ch loop make (sc, 2 hdc, 7 dc, 2 hdc, sc) and make the same for all remaining 3-ch loops, ending the last rep with sl st in 1st sc to join. (4 times)

Rnd 3: move to work behind Rnd 1, on back side slip st around connecting post of sc (place crochet hook through open hole and wrap the sl st around post to come up in the back)  chain 7 repeat around to make 4 parts to the 2 wings that line up with previous row. (4 times)

Rnd 4: in 1st 7-ch loop make (sc, 2 hdc, 9 dc, 2 hdc, sc) and make the same for all remaining 7-ch loops, ending the last rep with sl st in 1st sc to join. Do not fasten off. (4 times)

Antenna: *Ch 9, hdc in 3rd ch from hook, sl st in next ch until you reach the top of the butterfly* 1 antenna created. Repeat from * to create 2nd antenna. (2 times)

 Fasten off with a long tail for sewing. Tie tail and starting chain to tighten magic ring to adjust center of butterfly to liking. The looser the magic ring the more open the the base of the butterfly will be.

I use these on anything that needs just a little extra personality. Enjoy! Please let me know how they turn out and of course if you have any questions.