Abbreviations used in pattern:
Ch – Chain
SC – Single Crochet
DC – Double Crochet
TR – Triple Crochet
Sl – Slip
St – Stitch
YO – Yarn Over
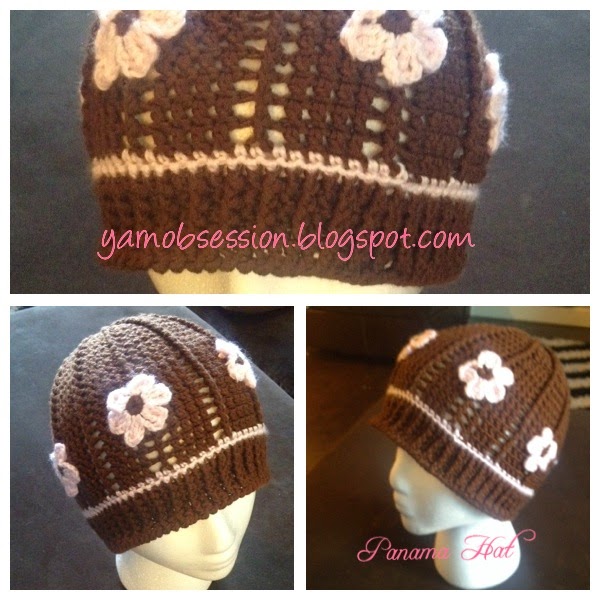
I have been obsessed with the Panama Hat Patterns I have seen posted all over Facebook and Pintrest. It is just too bad I don't speak Russian and Google while it might be great for many things does not translate crochet patterns into English very well at all. I was left with a big mess. Finally I am able to share one pattern that turned out for me.
This one is more straight than the twisty curve because of the positioning of the flowers. I will make adjustments if anyone is interested in additional ones with the more twisted look.
Size approx. 20”
Hook Size: C

To increase the size of the hat start with more DC in round 1 (12-15 will
increase the size). Recommend starting with 10 if using standard weight yarn
medium 4. If you choose to use the Patron thin delicate yarn it is really
pretty, but it is smaller so I recommend starting with more DC in round 1.
Chain 8 to make a ring - OR - Ch 3 (magic ring)
Round 1: 10 DC in the 3rd chain from hook to allow the ring to
adjust to the size you need. Sl st into st DC of the round
Front Post Double Crochet (Fpdc) – makes a double crochet around
the front of the post. Yarn over (YO) with front facing, insert your hook from
the front to the back around the post of the dc on the previous row. (The hook should be positioned
horizontally behind the double crochet that you’re working around)Complete the
st as a regular DC.
Round 2: Ch 4 Fpdc around first DC not the same DC as the connecting
round, ch1, Fpdc, ch1* in each st around, sl st to top of first DC at
the start of the round.
This looks like a pinwheel almost. You should have a Fpdc around each
post from row 1 with a ch1 space separating each post.
Round 3: Ch 3, Fpdc around same connecting post from the previous row,
ch1, DC in the top of the Fpdc from previous row, *Fpdc around DC in the
previous row, ch1, 1 DC*, repeat * to * to the end of the round. Sl st in
first DC.
Notes: row 3 - the DC is made in the same DC as the Fpdc. At the end of
the round it will look almost like an X shape.
Round 4: Ch 4, Fpdc in 1st post, ch1, 1 DC in next DC, ch1, Fpdc
next post, ch1, 1DC in next DC, ch1*, repeat * to * to the end of the
round. Sl st in first DC.
NOTE: the ch
spaces act as an increase but maintain the lovely square pattern throughout the
hat.
Round 5: Ch 3, 1 DC in same DC, ch1, Fpdc around next post, ch1, 2 DC
in next DC, ch1, 1 Fpdc in next post, ch1* repeat * to * to the end of the
round.
(Careful to
remember that each Fpdc is separated by a ch1 space. This maintains the lovely
square lace pattern down the side of the hat).
Sl st in first DC.
Round 6: Ch 3, 1 DC in same DC, 1 DC in next DC, ch1, Fpdc around next
post, ch1, *2 DC in next DC, 1 DC in next DC, ch1, 1 Fpdc in next post, ch1*
repeat * to * to the end of the round.
Pressed flat you should be able to see the pattern forming in groups between
the ch1 spaces, each row the number of DC increases between these ch1 spaces to
create the lovely pattern that makes this hat unique.
Round 7: Ch 3, 1 DC in same DC, 1 DC in next 2 DC, ch1, Fpdc around next
post, ch1, *2 DC in next DC, 1 DC in next 2 DC, ch1, 1 Fpdc in next post,
ch1* repeat * to * to the end of the round. Sl st in first DC to complete
the round.
Round 8: Ch 3, 1 DC in next DC, 1 DC in next 2 DC, (ch 3 counts
as a DC), ch1, Fpdc around next post, ch2, *1DC in next 4 DC, ch1, 1 Fpdc in
next post, ch1* repeat * to * to the end of the round. Sl st in first DC to
complete the round.
Repeat Round 8 until the hat measures 17cm from round 1 to the bottom
remember to maintain the ch1 spaces between each 4 DC and Fpdc to bring the lovely
box open through to the bottom of the hat.
Start of brim: Sl st color change (soft pink)
Round 1: Ch1 SC in each of next 4 DC across to ch1 space, 1 sc in ch1
space, 1 sc in Fdpc post, repeat * to * to end. Sl st.
Round 2: 1 SC in each sc around to end. Sl st.
Round 3: switch back to main color (brown) – ch 4, Fdpc next sc, DC in
next sc, Fpdc in next sc, DC in next sc, continue to end of round.
Round 4: Ch 3, Fdpc next post, DC in the top of the next Fpdc, Fpdc in
next post, 1 DC in next post,* repeate * to * to the end of the round. (the
pattern should look like DC, Fpdc, DC, Fpdc.
Round 5 – Round 8 repeat round 4 depending on desired length may add
another round if choose.
Round 9: will be worked backwards around the hat still on the front side,
with main color ch1, sl into previous st
(st to the right of the hook) pull up onto hook (2sts on hook) yo and pull
through all st on hook (sc), 1sc in previous st, repeat around the hat
(worked backwards without turning it over). The sc are worked from the last st
to the first st. It will feel a little strange working backwards but you will
get the hang of it.

Flowers (make 6)
Main color (brown)
Ch 7 connect to form a ring
5 sc in ring
switch color (pink)
ch4, 2 triple crochet in next st (yarn over twice instead of once like
for DC to create a triple crochet – it gives the petal a little height), ch 3
sl st into same sc, *ch 4 2 triple crochet in next st, ch 3, sl st into same
sc* (petal made), repeat * to * until 6 petals are made. Sl st to bind off
remembering to leave a longer tail to sew flower to hat.

Sew flowers to the hat just above the brim on the fpdc. I skipped every
other fpdc to balance them out evenly, but any flower and any place would look
lovely.
No comments:
Post a Comment